Deployment Plan Selection
Overview
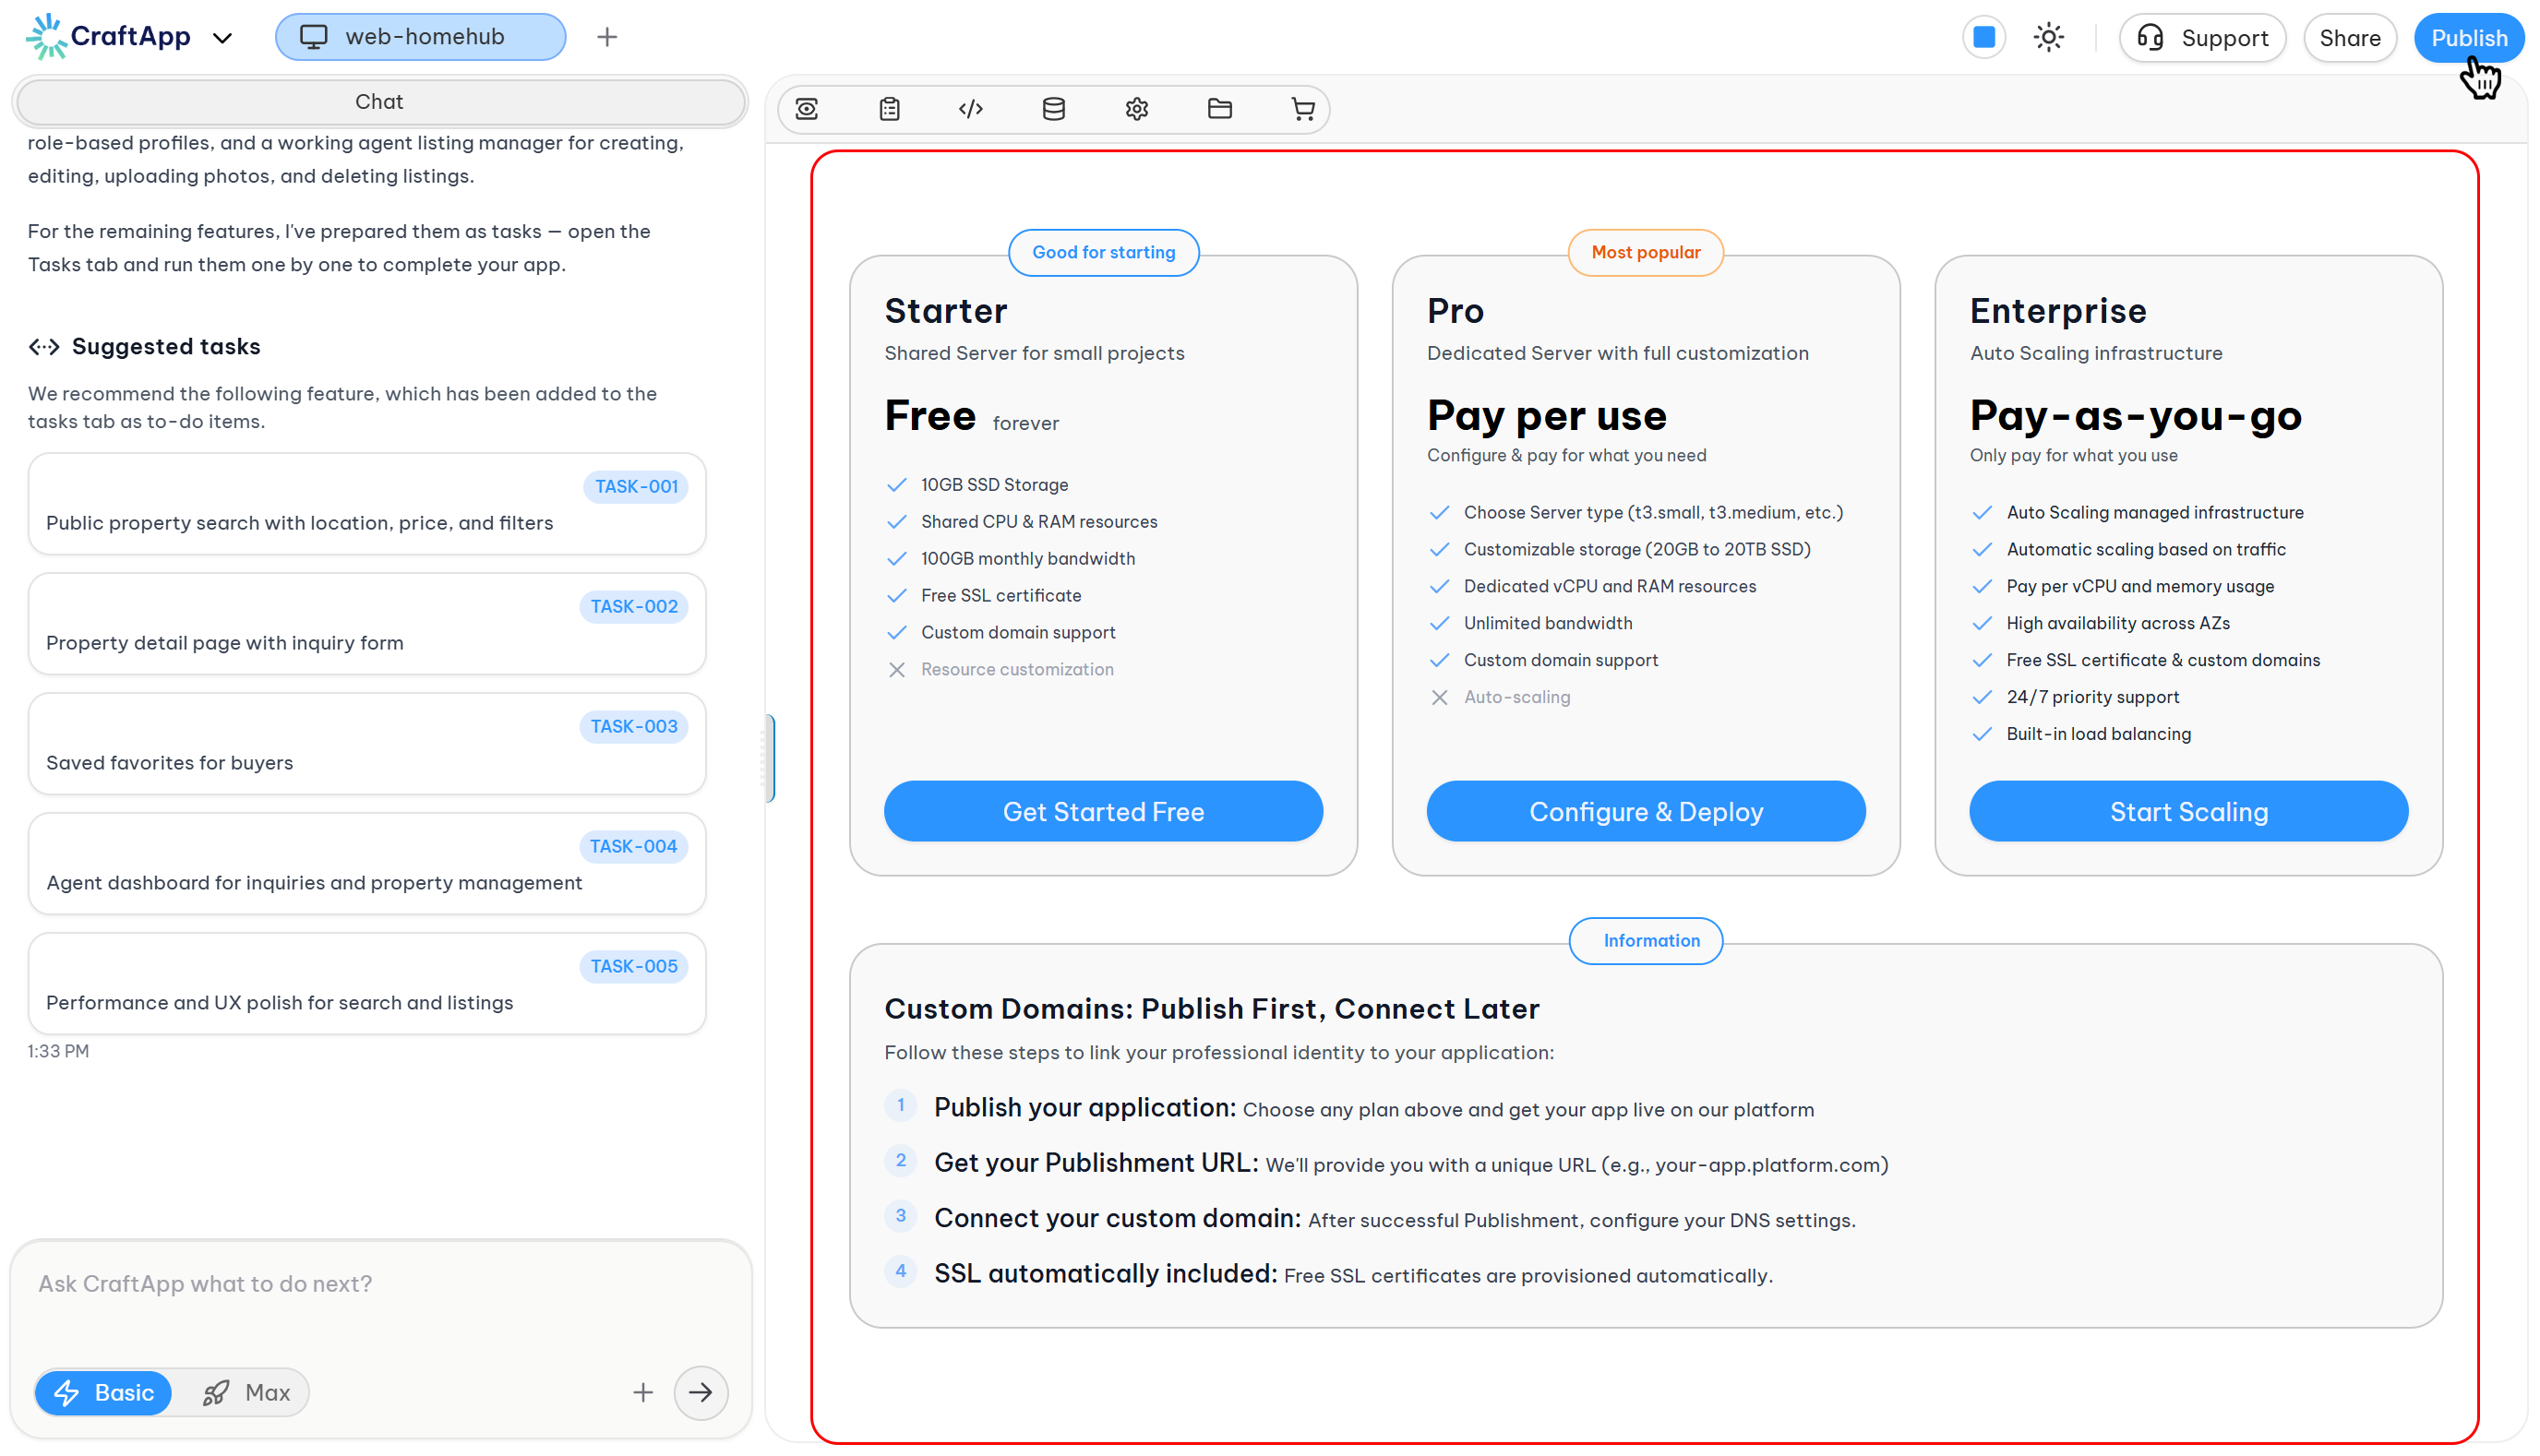
The Deployment Plan Selection page provides a structured interface for evaluating and selecting hosting plans for applications within Craftapp Studio.
Three deployment plans are available, each targeting different project scales and infrastructure requirements. The interface displays plan details, feature comparisons, and deployment guidance to support informed decision-making.
Available Plans
1. Starter Plan
Plan Type: Shared Hosting
Description: Shared infrastructure for testing and small projects.
Pricing: Free
Key Features:
- ✓ 1 GB RAM on shared compute instance
- ✓ 10 GB SSD Storage
- ✓ Shared vCPU resources
- ✓ 100 GB monthly bandwidth
- ✓ Free SSL certificate
- ✓ Custom domain support
- ✗ Resource customization
- ✗ Dedicated resources
Action Button: Get Started Free
Best For:
- Personal projects
- Testing and prototypes
- Small websites
- Low-traffic applications
2. Pro Plan
Plan Type: Dedicated Hosting
Badge: Most Popular
Description: Dedicated compute instance with full customization.
Pricing: Pay per use
Key Features:
- ✓ Choose compute instance type
- ✓ Customizable storage (20 GB to 200 GB SSD)
- ✓ Dedicated vCPU and RAM resources
- ✓ Unlimited bandwidth
- ✓ Free SSL certificate
- ✓ Custom domain support
- ✓ Multiple region selection (8 regions)
- ✗ Auto-scaling
Action Button: Configure & Deploy
Best For:
- Production applications
- Growing SaaS products
- Custom workloads
- Applications requiring dedicated resources
3. Enterprise Plan
Plan Type: Auto-scaling Infrastructure
Description: Enterprise-grade infrastructure with automatic scaling.
Pricing: Pay as you go
Key Features:
- ✓ Auto-scaling infrastructure
- ✓ Dynamic resource allocation
- ✓ High availability architecture
- ✓ Configurable minimum and maximum instances
- ✓ Dedicated cloud architecture
- ✓ Free SSL certificate
- ✓ Custom domain support
- ✓ Enterprise networking
Action Button: Start Scaling
Best For:
- High-traffic enterprise applications
- Applications with unpredictable traffic patterns
- Mission-critical workloads
- Large-scale SaaS platforms
Plan Comparison
| Feature | Starter | Pro | Enterprise |
|---|---|---|---|
| Infrastructure | Shared compute | Dedicated compute | Auto-scaling dedicated |
| Pricing Model | Free | Pay per use | Pay as you go |
| Compute Resources | Shared vCPU/RAM | Dedicated vCPU/RAM | Dynamic vCPU/RAM |
| Instance Selection | Fixed | Configurable | Auto-scaling |
| Storage | 10 GB SSD (fixed) | 20-200 GB SSD (configurable) | Dynamic |
| Bandwidth | 100 GB monthly | Unlimited | Usage-based |
| Custom Domain | ✅ | ✅ | ✅ |
| SSL Certificate | ✅ | ✅ | ✅ |
| Resource Customization | ❌ | ✅ | Partial (scaling limits) |
| Auto-scaling | ❌ | ❌ | ✅ |
| High Availability | ❌ | ❌ | ✅ |
| Region Selection | ❌ | ✅ (8 regions) | ✅ (2 regions) |
Custom Domains: Deploy First, Connect Later
Process Overview
Custom domains are connected after successful application deployment.
Step-by-Step Process:
-
Deploy the application – Select any plan and deploy the application to the platform.
-
Obtain the deployment URL – A unique URL is provided (e.g.,
your-app.platform.com). -
Connect the custom domain – After successful deployment, configure DNS settings to point to Craftapp servers.
-
SSL certificate provisioning – Free SSL certificates are provisioned automatically for all connected custom domains.
Note
The application must be deployed and running before a custom domain can be connected. This ensures seamless SSL provisioning and zero downtime during the domain switch.
Plan Positioning
| Plan | Target Audience | Key Differentiator | Best Use Case |
|---|---|---|---|
| Starter | Beginners, hobbyists, small projects | Completely free, no configuration required | Testing, prototypes, personal websites |
| Pro | Growing applications, production workloads | Dedicated resources with full customization | Production apps, custom workloads |
| Enterprise | Enterprise organizations, high-traffic platforms | Auto-scaling infrastructure with high availability | Large-scale systems, unpredictable traffic |
Decision Support
Choosing the Right Plan
Select Starter when:
- Testing an application concept
- Building a personal project
- Traffic expectations are low
- Budget is the primary consideration
Select Pro when:
- Launching a production application
- Dedicated resources are required
- Custom server configuration is needed
- Traffic is consistent and growing
Select Enterprise when:
- Application serves high or unpredictable traffic
- High availability is critical
- Automatic scaling is required
- Enterprise-grade infrastructure is necessary
Note
Enterprise Plan access requires a minimum of 3 months on the Pro Plan. See Enterprise Deployment Plan for eligibility details.
Deployment Process Overview
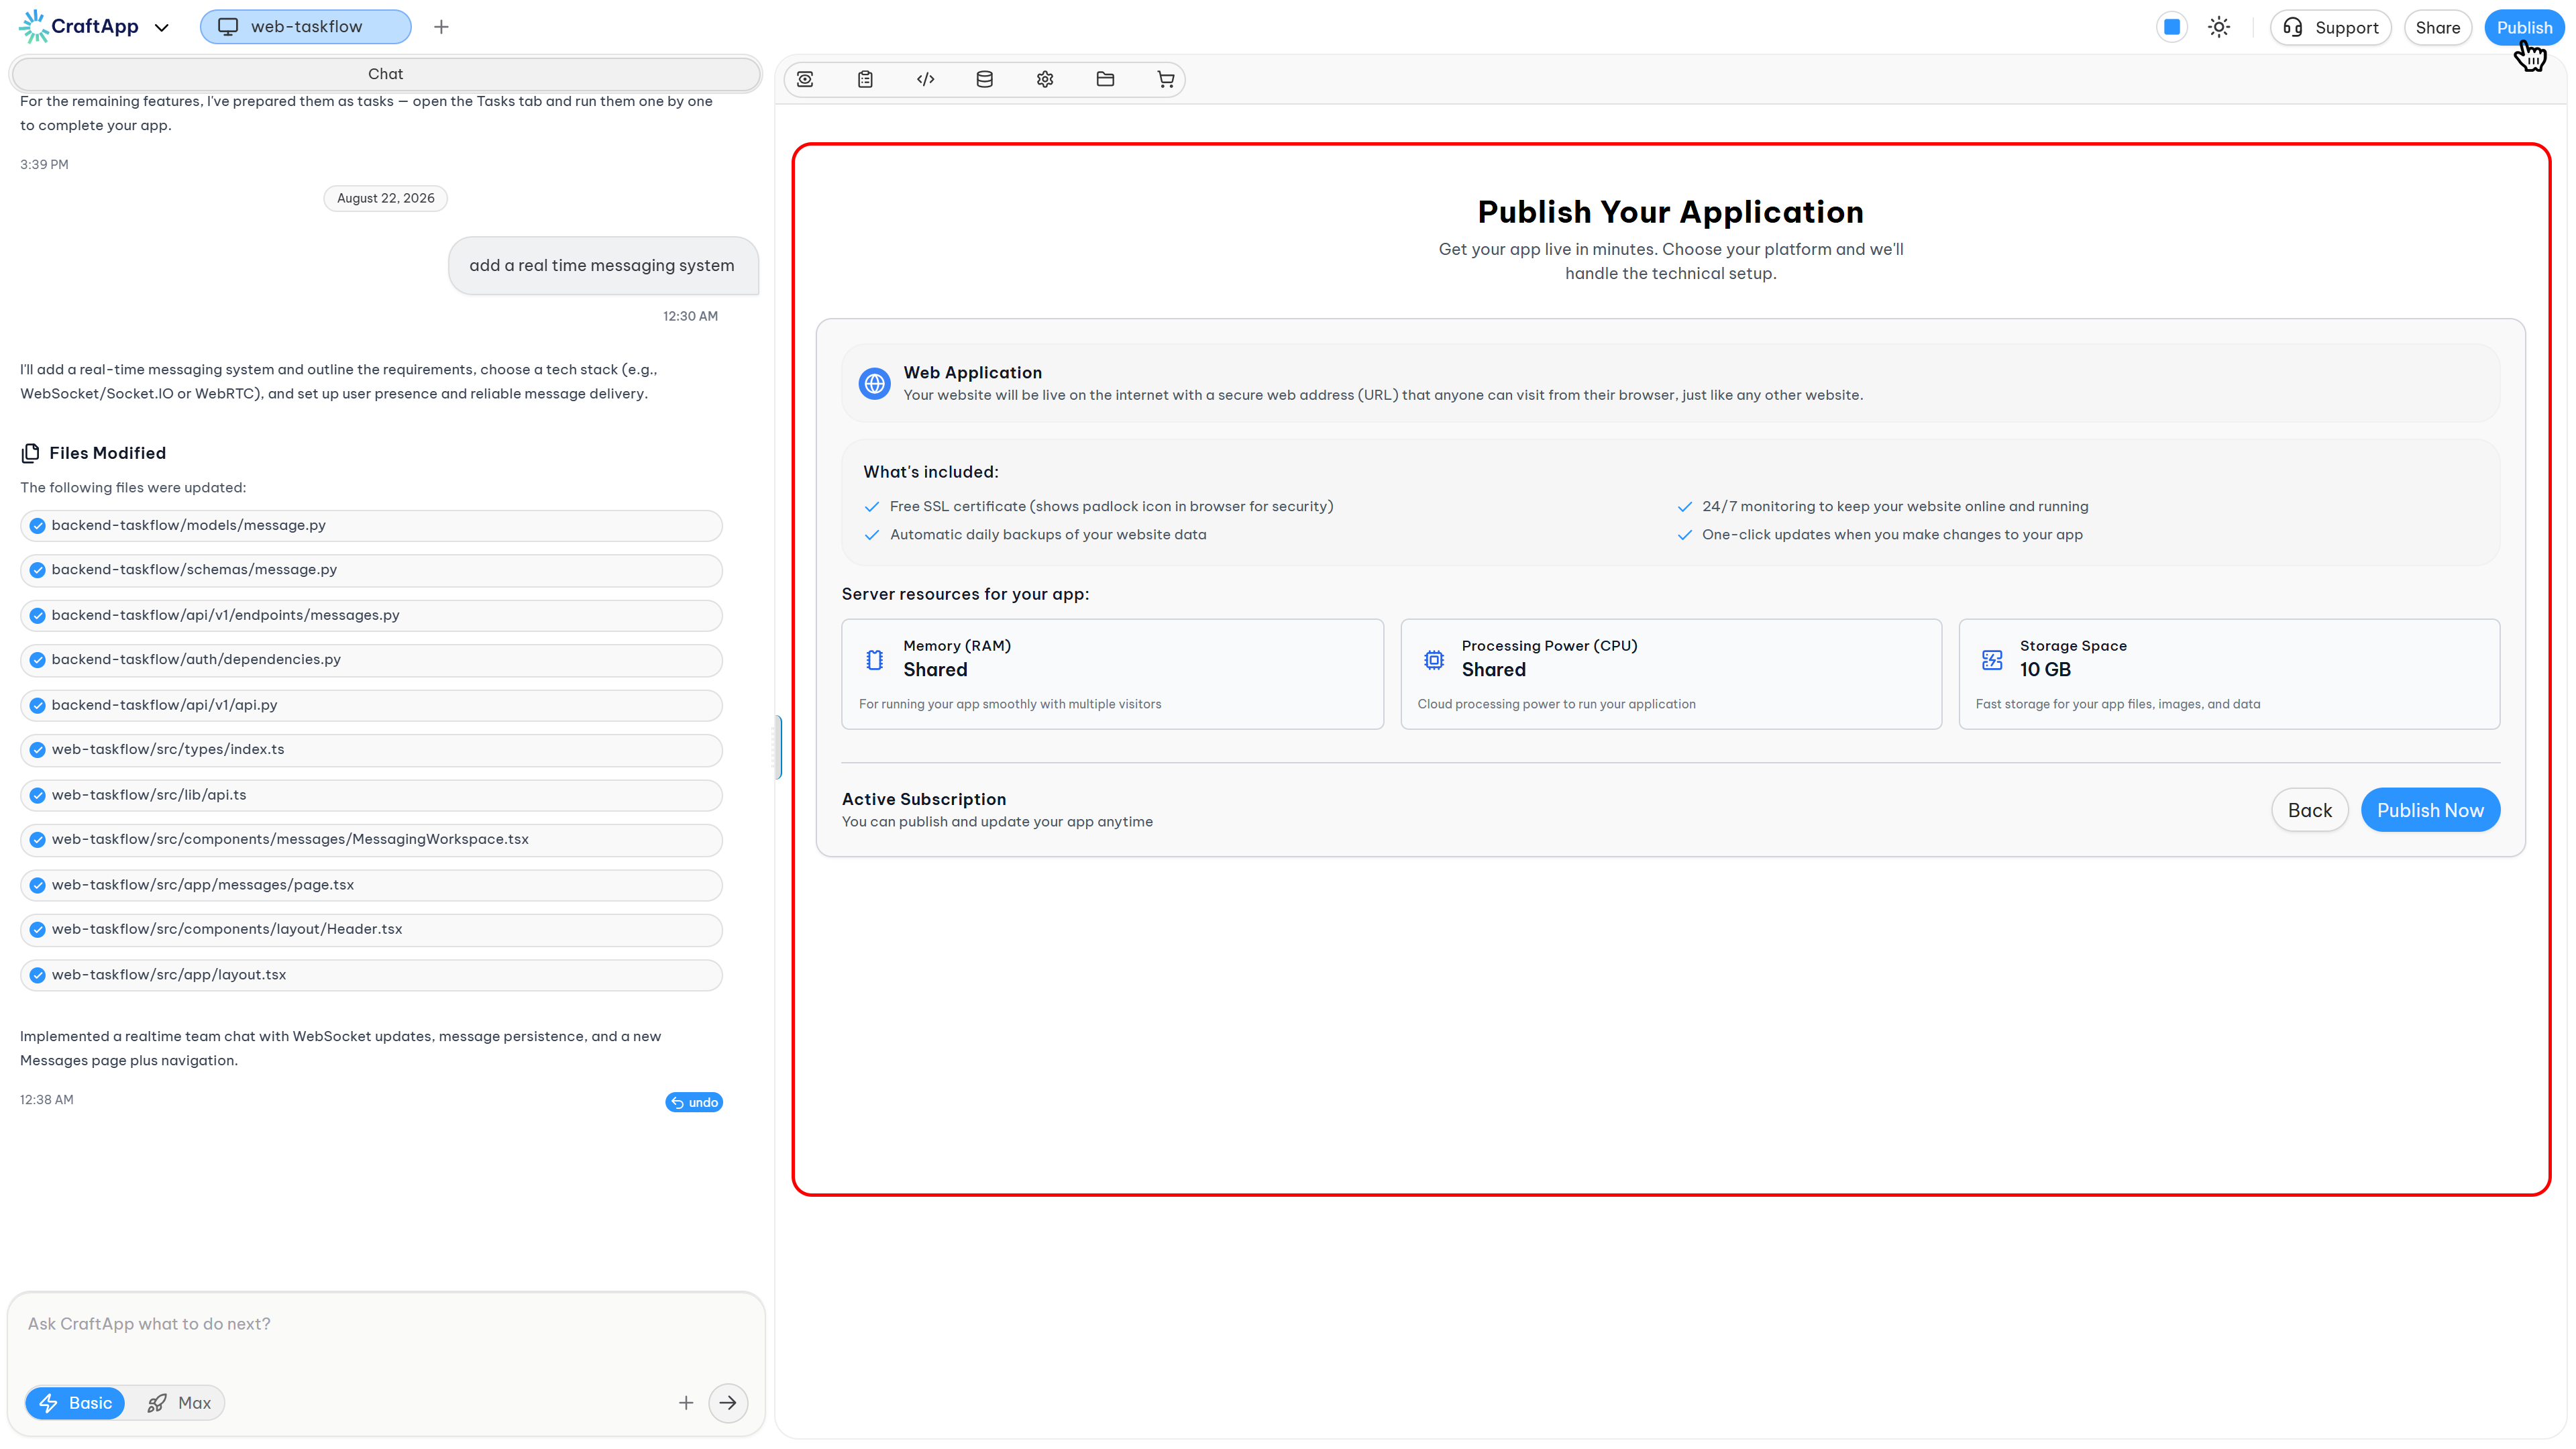
Starter Plan
- Click Get Started Free.
- Review included resources.
- Confirm deployment.
- Application is provisioned automatically.
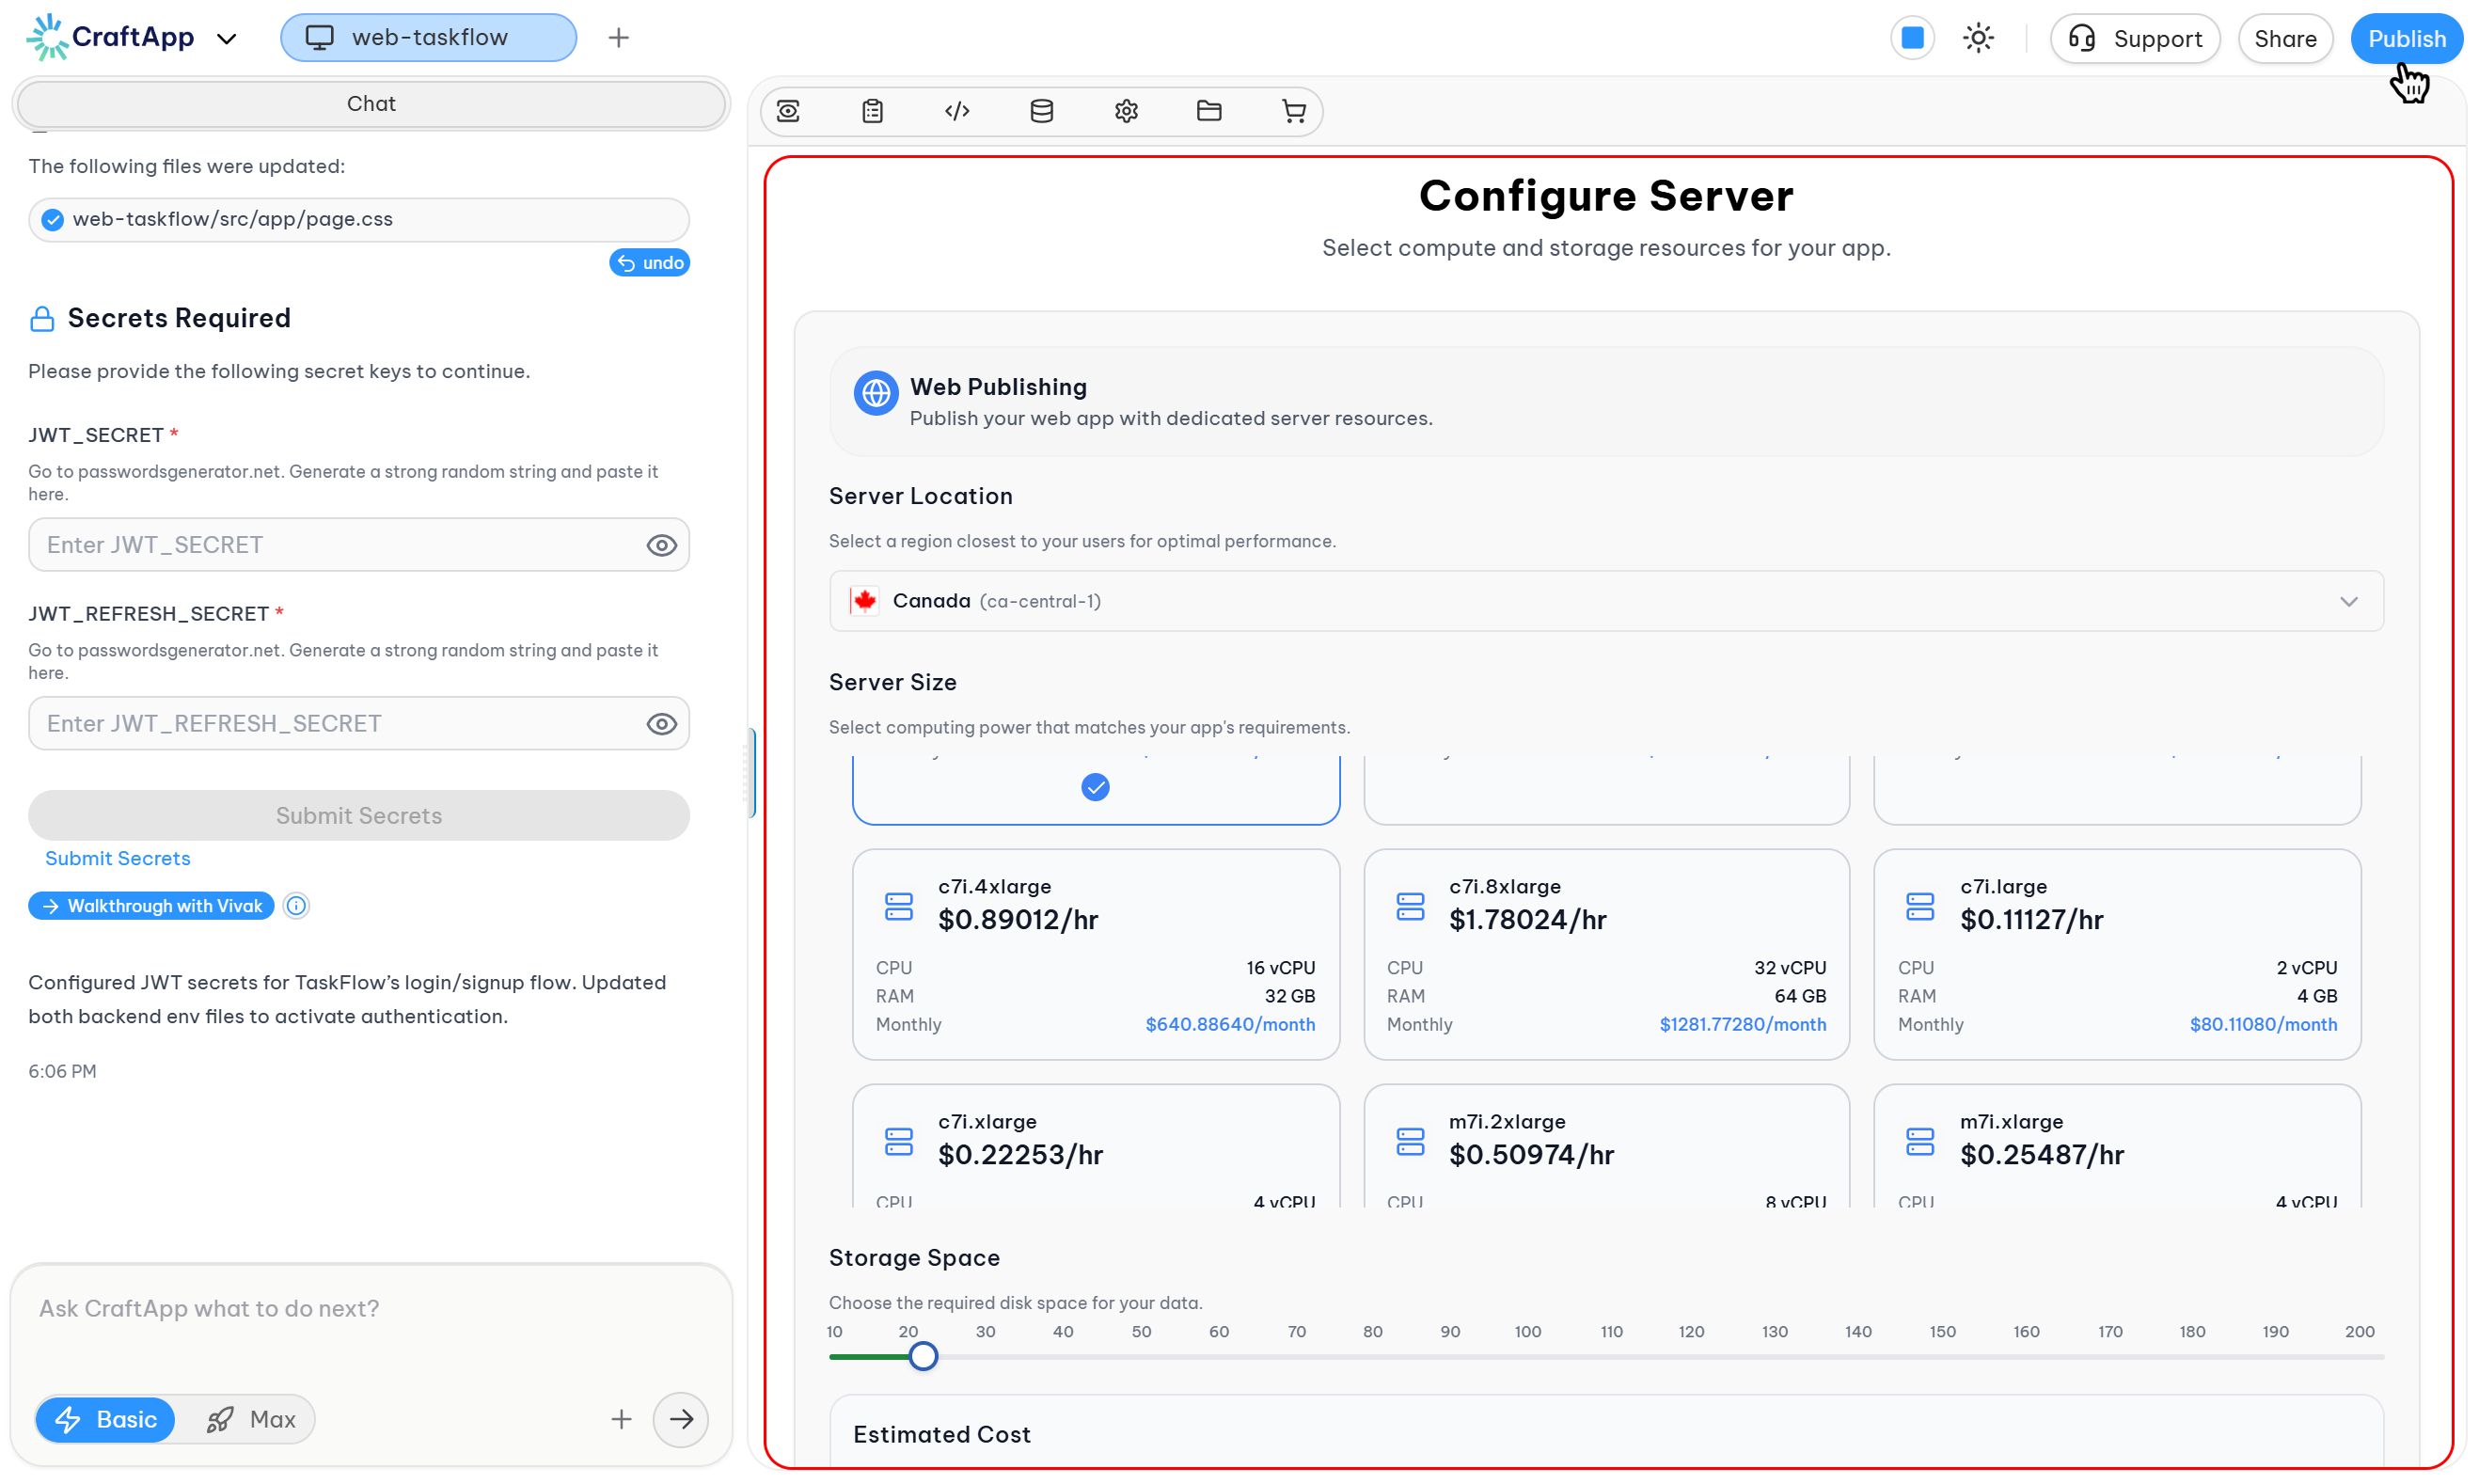
Pro Plan
- Click Configure & Deploy.
- Configure region, server size, and storage.
- Review cost summary.
- Click Publish Now.
- Application is provisioned.
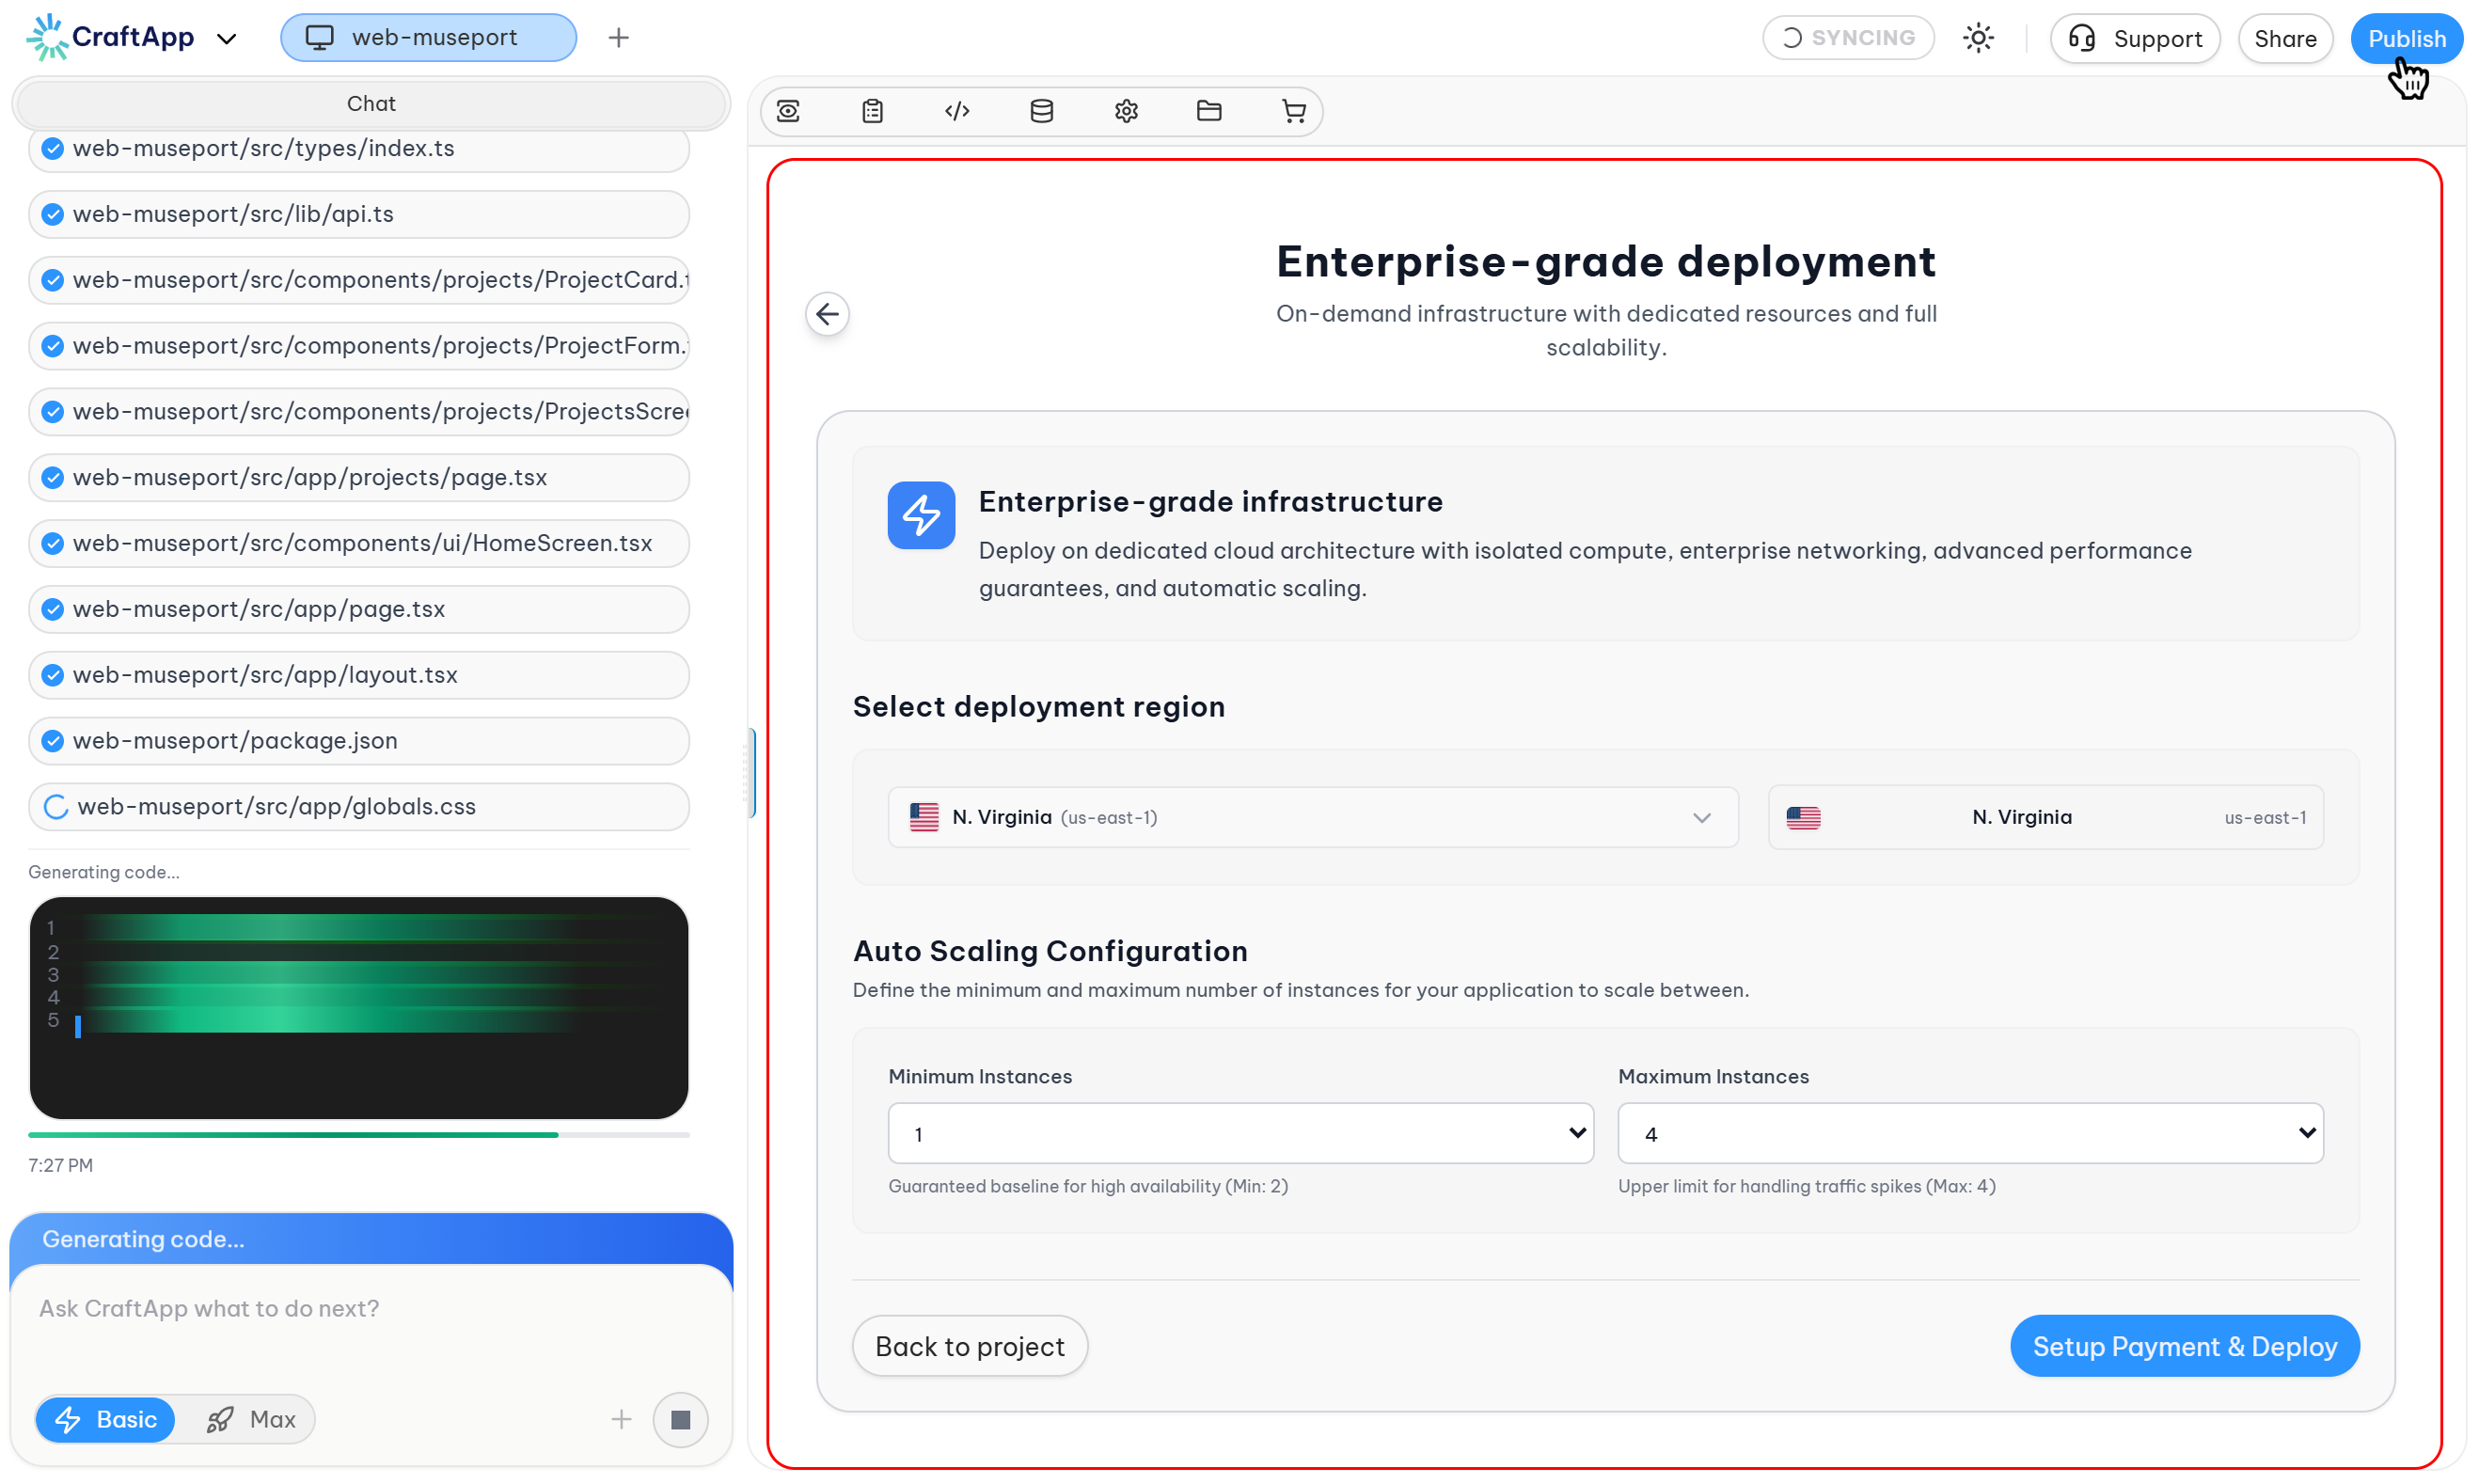
Enterprise Plan
- Click Start Scaling.
- Select deployment region.
- Configure minimum and maximum instances.
- Click Setup Payment & Deploy.
- Complete payment configuration.
- Application is provisioned.
Visual Design Reference
Layout
- Plans displayed in a vertical layout for mobile-friendly viewing
- "Most Popular" badge highlights the Pro Plan
- Feature lists use checkmarks (✓) for included features and X marks (✗) for unavailable features
- Clear call-to-action buttons for each plan
Color & Emphasis
- Green accents for badges, checkmarks, and primary action buttons
- Neutral colors for unavailable features
- Clear typography for plan names and pricing
Best Practices
Tip
- Start with Starter for testing and small projects
- Choose Pro for production applications requiring dedicated resources
- Upgrade to Enterprise after 3 months on Pro if auto-scaling becomes necessary
- Deploy first before attempting to connect custom domains
- Allow DNS propagation time (24-48 hours) after connecting a custom domain
- Review pricing carefully before confirming deployment
Summary
The Deployment Plan Selection page provides:
- Three deployment tiers: Starter, Pro, and Enterprise
- Transparent feature comparison with visual indicators
- Free option for testing and small projects
- Pay-per-use flexibility for production workloads
- Pay-as-you-go auto-scaling for enterprise applications
- Clear custom domain workflow with automatic SSL provisioning
This interface simplifies infrastructure selection by presenting clear plan options with detailed feature comparisons and deployment guidance.